I love a beautifully dressed table. You may recall my earlier post which covered some of the dos and don’ts of using tablecloths, which can be read here.
So often I want a party or gathering to carry a theme for which I don’t already own a table covering. Thanks to convenient, affordable fabrics at retailers such as Walmart, Joanns, and even eBay, an appropriate tablecloth is just a few dollars and a couple of hours away!
To make your own tablecloths, here is what you need to do:
- Measure your table(s). You need both width and length.
- Add about 10 inches to each side, so 20 inches added to length and 20 inches added to width.
- Then add inches for your hem. I like to do a 1 1/2 inch double hem on all sides, so I would add 3 additional inches to width and length.
- Identify what fabric you want to purchase. What is its width? If it is wider than the width of your tablecloth, then all you need to do is purchase the length of fabric you need for the length of your tablecloth. I always add a few inches for straightening the edges on both ends. If the width of the fabric is narrower than what you need, you will need to purchase two (or three, if you have a particularly wide table or narrow fabric) lengths of fabric. Measure twice, cut once is the golden rule. Think it through.
- Once you have the amount of fabric you need, decide if you want to pre-wash your fabric. I do not, if it is an inexpensive fabric to be used at an event. I like to keep the sizing that comes in the fabric that helps to keep it stiff and the waft and weft even. If I will be using the tablecloth just for my family, I will pre-wash it. This type tablecloth will have lots of washings over its lifetime, so it is best to prewash.
- Iron the fabric. If pre-washed, iron and starch. If not pre-washed, just iron. I leave the lengthwise centerfold in the fabric.
- Trim each short end of fabric, squaring up the edges. They rarely are cut straight or even.
- Cut off the selvage edge of each side of the lengthwise sides.
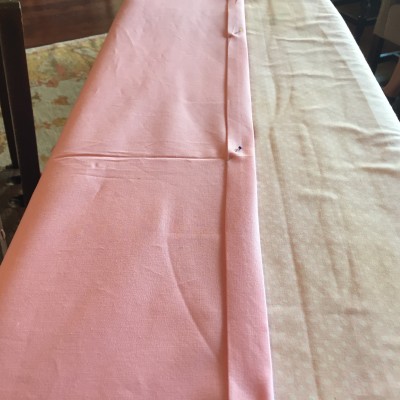
- Fold and iron the hems on the short ends. I like to use a Clover pressing aid, starch and a hot iron. Pin the hem every 12 or 15 inches.
- Fold and iron the hems of the long sides, again using the pressing aid, starch, hot iron, and pins.
- Now miter the corners. To me this makes the difference in looking professionally made instead of homemade. Using the iron marks, turn under the fabric, trim any excess, and pin. If you need help with this, look for a YouTube video to assist.
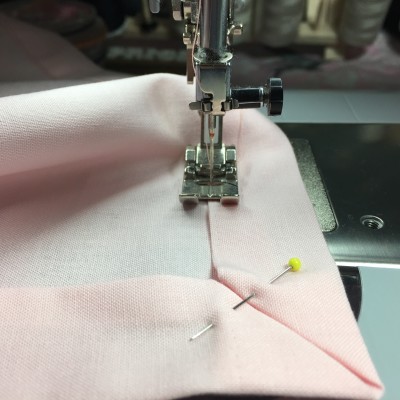
- Sew all the way around with cloth with thread and bobbin thread of matching color. I like to secure stitch at the corners (see photo).
- Now press your seams.
- Trim any loose thread ends.
If you need to sew two pieces of fabric together to have a cloth wide enough to cover your table, you can put a seam down the middle (not as preferable) or center one length of fabric and cut the other length in half, thus sewing two seams to create your width (preferable). If I plan to use a table runner, then I do just sew one seam.
In about an hour, you can create a custom tablecloth that will be a perfect backdrop to your food, tablescape, and gathering!
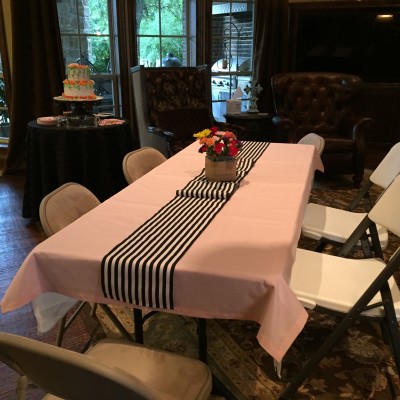
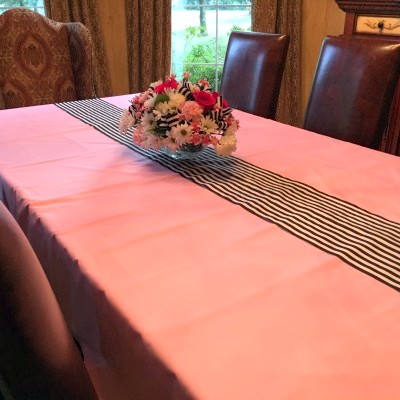
Bonus Information: To make a table runner, use the same technique, just making the runner much narrower and a little shorter than your tablecloth. For a 30″ wide table, I like an 8-10″ wide runner. For a 50″ wide table, I like a 12-15″ wide runner.
More Bonus Information: Always use a liner underneath your tablecloth. I use white tablecloths or cut quilt batting to the size of the table top. It makes the tablecloth look truer in color, deafens some of the table sounds, and gives even a cheap tablecloth a sense of quality.